Dropping a disk from diskgroup is simple but you need to use disk name rather than disk path while dropping.
Checking the diskgroups present
[oracle@11grac1 ~]$ sqlplus / as sysasm
SQL*Plus: Release 11.2.0.1.0 Production on Thu Mar 25 10:44:12 2010
Copyright (c) 1982, 2009, Oracle. All rights reserved.
Connected to:
Oracle Database 11g Enterprise Edition Release 11.2.0.1.0 - Production
With the Real Application Clusters and Automatic Storage Management options
SQL> select name,type,group_number from v$asm_diskgroup;
NAME TYPE GROUP_NUMBER
---------- ------------------ ------------------
DATA EXTERN 1
DG1 EXTERN 2
Checking the disks in the diskgroup
SQL> col path for a30;
SQL> select name,path,group_number from v$asm_disk order by 3;
NAME PATH GROUP_NUMBER
---------- ------------------ ------------------------- ------------
/dev/sdh1 0
DATA_0002 /dev/sdd1 1
DATA_0000 /dev/sdb1 1
DATA_0001 /dev/sdc1 1
DG1_0002 /dev/sdg1 2
DG1_0001 /dev/sdf1 2
DG1_0000 /dev/sde1 2
Now dropping the disk /dev/sdd1 from diskgroup DATA
SQL> alter diskgroup data drop disk '/dev/sdd1';
alter diskgroup data drop disk '/dev/sdd1'
*
ERROR at line 1:
ORA-15032: not all alterations performed
ORA-15054: disk "/DEV/SDD1" does not exist in diskgroup "DATA"
Correct Syntax is
SQL> alter diskgroup data drop disk DATA_0002;
Diskgroup altered.
Hence while dropping you must use the disk name not the disk path.
Thursday, March 25, 2010
Wednesday, March 24, 2010
Recovering a deleted/corrupted OCR disk without having any backup in Oracle 10g RAC
Demonstrating how to recover a corrupted OCR disk when all the OCR backups are lost/deleted.
Using Oracle 10g R2 RAC 10.2.0.1 on RHEL AS4
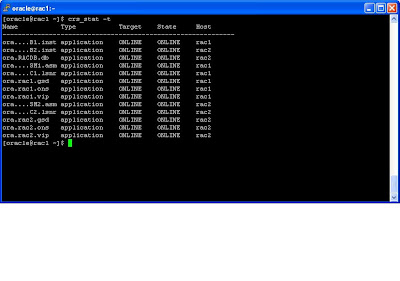
1) Verifying all service are up and running
 2) Cheking the location of the OCR disks.

3)Simulating the disk failure

4) Go to the $CRS_HOME/install directory as root user and run rootdelete.sh script on both the nodes
one after another


eth0 172.25.0.0 -------------For Public Interface
eth1 172.25.0.0-------------For Private Interface
[oracle@rac1 dbs]$ oifcfg setif -global eth0/172.25.0.0:public
[oracle@rac1 dbs]$ oifcfg setif -global eth1/172.25.0.0:cluster_interconnect
After Configuring Network Interface
[oracle@rac2 ~]$ oifcfg getif
eth0 172.25.0.0 global public
eth1 172.25.0.0 global cluster_interconnect
9) Add TNS Listener information to OCR using netca. Reconfigure your listener using netca
10) Add all the services (ASM,INSTANCE,DATABASE) to OCR using srvctl command
[oracle@rac1 ~]$ srvctl add asm -n rac1 -i +ASM1 -o /u01/app/oracle/product/10.2.0/db_1
[oracle@rac1 ~]$ srvctl add asm -n rac2 -i +ASM2 -o /u01/app/oracle/product/10.2.0/db_1
[oracle@rac1 ~]$ srvctl add database -d RACDB -o /u01/app/oracle/product/10.2.0/db_1
[oracle@rac1 ~]$ srvctl add instance -d RACDB -i RACDB1 -n rac1
[oracle@rac1 ~]$ srvctl add instance -d RACDB -i RACDB2 -n rac2
[oracle@rac1 ~]$ srvctl start asm -n rac1
[oracle@rac1 ~]$ srvctl start asm -n rac2
[oracle@rac1 ~]$srvctl start database -d RACDB
Add any other service if you have any.
Using Oracle 10g R2 RAC 10.2.0.1 on RHEL AS4
1) Verifying all service are up and running

one after another

5) Go to $CRS_HOME/install directory as root user and run rootdeinstall.sh script from the node where you have started your cluster installation here i am using rac1 node. It has to be executed on one node only.

6) Go to $CRS_HOME directory as root user and run root.sh script on both nodes one at a time.

After running root.sh on both the nodes run vipca from second node as root user . After doing that your OCR is recovered. .
7) Configure the Server Side ONS using racgons
Syntax: $CRS_home/bin/racgons add_config hostname1:port hostname2:port
[oracle@rac1 dbs]$ racgons add_config rac1:6200 rac2:6200
8) Configure Network Interfaces for Clusterware
If we wont configure netwok interfaces then Oracle Interface COnfiguration will not list the public and private interconnect information
Before Configuring Network Interface
[oracle@rac1 dbs]$ oifcfg getif --------will display no output
Now configure the network Interface
[oracle@rac1 dbs]$ oifcfg iflist
eth0 172.25.0.0 -------------For Public Interface
eth1 172.25.0.0-------------For Private Interface
[oracle@rac1 dbs]$ oifcfg setif -global eth0/172.25.0.0:public
[oracle@rac1 dbs]$ oifcfg setif -global eth1/172.25.0.0:cluster_interconnect
After Configuring Network Interface
[oracle@rac2 ~]$ oifcfg getif
eth0 172.25.0.0 global public
eth1 172.25.0.0 global cluster_interconnect
9) Add TNS Listener information to OCR using netca. Reconfigure your listener using netca
10) Add all the services (ASM,INSTANCE,DATABASE) to OCR using srvctl command
[oracle@rac1 ~]$ srvctl add asm -n rac1 -i +ASM1 -o /u01/app/oracle/product/10.2.0/db_1
[oracle@rac1 ~]$ srvctl add asm -n rac2 -i +ASM2 -o /u01/app/oracle/product/10.2.0/db_1
[oracle@rac1 ~]$ srvctl add database -d RACDB -o /u01/app/oracle/product/10.2.0/db_1
[oracle@rac1 ~]$ srvctl add instance -d RACDB -i RACDB1 -n rac1
[oracle@rac1 ~]$ srvctl add instance -d RACDB -i RACDB2 -n rac2
[oracle@rac1 ~]$ srvctl start asm -n rac1
[oracle@rac1 ~]$ srvctl start asm -n rac2
[oracle@rac1 ~]$srvctl start database -d RACDB
Add any other service if you have any.
Monday, March 15, 2010
Copying/Moving a datafile from one diskgroup to another diskgroup
Steps involved in moving/copying a datafile from one diskgroup to another diskgroup
1) Use rman to copy the datafile to another diskgroup.
2) Offline the datafile
3) Switch the datafile to the copy
4) Recover the datafile
5) Online the datafile
RMAN> report schema;
Report of database schema
List of Permanent Datafiles
===========================
File Size(MB) Tablespace RB segs Datafile Name
---- -------- -------------------- ------- ------------------------
1 480 SYSTEM *** +DG1/racdb/datafile/system.261.713375891
2 200 UNDOTBS1 *** +DG1/racdb/datafile/undotbs1.516.713375845
3 620 SYSAUX *** +DG1/racdb/datafile/sysaux.517.713375779
4 200 UNDOTBS2 *** +DG1/racdb/datafile/undotbs2.515.713375845
5 5 USERS *** +DG1/racdb/datafile/users.262.713375891
6 3 TS1 *** +DG1/racdb/datafile/ts1.450.713706851-----moving this file to other diskgroup 'FRA'
List of Temporary Files
=======================
File Size(MB) Tablespace Maxsize(MB) Tempfile Name
---- -------- -------------------- ----------- --------------------
1 29 TEMP 32767 +DG1/racdb/tempfile/temp.264.708103309
1) Connect to rman and copy the datafile .
Here i am moving the datafile 6 from diskgroup DG1 to diskgroup FRA
RMAN> copy datafile 6 to '+FRA';
Starting backup at 15-MAR-10
allocated channel: ORA_DISK_1
channel ORA_DISK_1: sid=121 instance=RACDB1 devtype=DISK
channel ORA_DISK_1: starting datafile copy
input datafile fno=00006 name=+DG1/racdb/datafile/ts1.450.713706851
output filename=+FRA/racdb/datafile/ts1.257.713707167 tag=TAG20100315T115925 recid=13 stamp=713707167
channel ORA_DISK_1: datafile copy complete, elapsed time: 00:00:03
Finished backup at 15-MAR-10
Starting Control File and SPFILE Autobackup at 15-MAR-10
piece handle=/u01/app/oracle/rman/cont_auto_c-705719985-20100315-04 comment=NONE
Finished Control File and SPFILE Autobackup at 15-MAR-10
2) Take the datafile which you want to move to offline state
RMAN> sql "alter database datafile 6 offline";
3) Switch the datafile to copy; It is same as issuing "alter database rename file statement"
RMAN> switch datafile 6 to copy;
datafile 6 switched to datafile copy "+FRA/racdb/datafile/ts1.257.713707167"
4) Recover the datafile 6
RMAN> recover datafile 6;
Starting recover at 15-MAR-10
using channel ORA_DISK_1
starting media recovery
media recovery complete, elapsed time: 00:00:04
Finished recover at 15-MAR-10
5) Online the datafile 6
RMAN> sql "alter database datafile 6 online";
RMAN> report schema;
Report of database schema
List of Permanent Datafiles
===========================
File Size(MB) Tablespace RB segs Datafile Name
---- -------- -------------------- ------- ------------------------
1 480 SYSTEM *** +DG1/racdb/datafile/system.261.713375891
2 200 UNDOTBS1 *** +DG1/racdb/datafile/undotbs1.516.713375845
3 620 SYSAUX *** +DG1/racdb/datafile/sysaux.517.713375779
4 200 UNDOTBS2 *** +DG1/racdb/datafile/undotbs2.515.713375845
5 5 USERS *** +DG1/racdb/datafile/users.262.713375891
6 3 TS1 *** +FRA/racdb/datafile/ts1.257.713707167 ----moved from '+DG1' to '+FRA' diskgroup.
List of Temporary Files
=======================
File Size(MB) Tablespace Maxsize(MB) Tempfile Name
---- -------- -------------------- ----------- --------------------
1 29 TEMP 32767 +DG1/racdb/tempfile/temp.264.708103309
Thursday, March 11, 2010
Installing Oracle 11g R2 Grid Infrastructure
Steps for installing 11g R2 grid infrastructure
I have installed 11g R2 grid infrastructure for cluster on OEL 5 using vmware server 2.0.
1) Here i am going with grid infrastructure for cluster

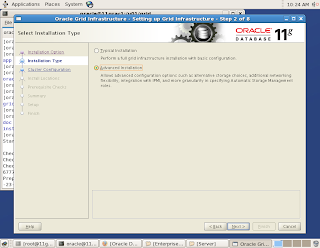
2) Going with advanced installation
3) Select the language

4) SCAN - Single Client Access Name
Oracle 11g R2 introduced new concept called Single Client Access Name (SCAN).
It eliminates the need to change TNS Entry when nodes are added to or removed from the Cluster and also creates the location independence for the clients.
Here i am adding a scan vip entry in the /etc/hosts file. This vip should not be accessible
SCAN IP, VIP and PUBLIC IP should be on the same subnet.

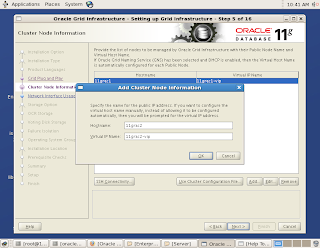
5) Here since we are not going with GNS for the vip, so manually feeding the vip info for both the nodes.

6) Here ssh is checking for the connectivity.

7) Providing the interfaces for public and private ip

8) From 11g R2 we don't have the option of going with raw devices or OCFS for OCR and VD. We have to use either ASM diskgroup or some clustered file system

9) Creating diskgroup for keeping OCR and Voting Disk


Selecting all the 3 disks for the diskgroup

10) Setting the password

11)

12)Created 3 OS groups and assinging groups for os authentication to ASM

13)Providing the orainventory location and location for grid installation

14) Checking for pre-reqs

Due to insufficient memory it is throwing messages, but ignoring those messages and proceeding. The minimum memory required for 11g R2 is 1.5G


15) After the binaries are installed on to both the nodes it will propmt you to execute 2 scripts
a)oranstRoot.sh
b)root.sh
Execute both scripts on each node one after the other.
After executing the remaining configuration installations will be done.

After this the installation of grid infrastructure is completed.
I have installed 11g R2 grid infrastructure for cluster on OEL 5 using vmware server 2.0.
1) Here i am going with grid infrastructure for cluster

2) Going with advanced installation


Oracle 11g R2 introduced new concept called Single Client Access Name (SCAN).
It eliminates the need to change TNS Entry when nodes are added to or removed from the Cluster and also creates the location independence for the clients.
Here i am adding a scan vip entry in the /etc/hosts file. This vip should not be accessible
SCAN IP, VIP and PUBLIC IP should be on the same subnet.


a)oranstRoot.sh
b)root.sh
Execute both scripts on each node one after the other.
After executing the remaining configuration installations will be done.

After this the installation of grid infrastructure is completed.
Subscribe to:
Posts (Atom)